You can find more ornaments here.
What’s a down-home Christmas without some down-home Christmas tree ornaments?
Check out the fun, and unique, ideas from Family Fun. (And no, Family Fun has not compensated me in any way – I don’t go down that road. I’m simply passing on some interesting information, calm down).
Here’s a neat one for those that have real Christmas trees:
A chip off the old block, these wooden ornaments preserve the piney memories of Christmases past.
Materials
* Handsaw
* Pine disk
* Copper wire
* Ribbon trim or cord
* Glue
* Artificial greenery and berries optional
* Marker or craft paint
Instructions
1. Saw a cross section from the bottom of your Christmas tree trunk before putting it into its stand for decorating (a parent’s job). Alternately, you can saw a smaller piece from the middle after the holidays are over. This is your pine disk.
2. Wrap a length of thin wire around the pine disk and twist it into a loop at the top for hanging. Tie on a ribbon, glue on some trim, or add greenery, berries, or other decorations.
3. Write the year across the front with a marker or craft paint. If the wood surface is too rough, sand it down a bit before writing.
4. For an extra remembrance, glue on a fun Christmas-morning snapshot before you store the ornaments away for next year.
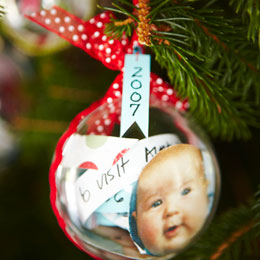
Commemorate your baby’s first Noel — and each one thereafter — with a tree ornament that’s filled with handwritten recollections of the year. The plastic balls are easy to open, so your child can reread the notes every Christmas.
Materials
* Fillable clear plastic ornament (ours is 80 mm)
* Double-sided tape (we used Terrifically Tacky Tape for its extra-strong hold)
* Rickrack or ribbon
* Scrapbooking paper cut into strips (ours are 5/8 inch wide)
* Small photos or other memorabilia that fits inside the ball
Instructions
1. Separate the two halves of the ball. Apply a strip of tape around the outside of the wider half. Carefully press the ribbon to the tape so that it’s close to but not touching the outer edge.
2. Write notes on the strips of scrapbooking paper, then roll them up and tuck them inside the ball. Add pictures, a photocopy of your child’s newborn footprint, and other mementos, if you like. Put the ball back together, then tie some ribbon and a tag with the year written on it onto the plastic loop.
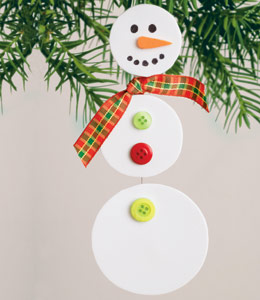
It doesn’t take a single flake to build this frosty character — you can round him up with white foam, buttons, and ribbon.
Materials
* 3 round objects (we used a spice jar lid, the bottom of a yogurt container, and a mason jar lid)
* Scissors
* Craft foam, white and orange
* Glue dots
* Monofilament
* Buttons
* Permanent marker
* Ribbon
Instructions
1. Using the round objects as patterns, cut out 2 white foam circles in each size.
2. Dangling Snowman Step 2 Place one set of the circles on a flat surface, spacing them 1/4 inch apart. With glue dots, glue a 12-inch piece of monofilament across the circles as shown, then firmly press the matching circles on top.
3. Use more glue dots to attach buttons and an orange craft foam nose. With a permanent marker, draw on eyes and a mouth. Finally, tie a ribbon scarf around the monofilament at the neck, and then knot the line above the head to create a loop for hanging.
Sweeten up the Christmas tree with a collection of chocolate mice ornaments.
Materials
* Hershey’s Kisses
* Pink felt
* Scissors
* Double-sided carpet tape
* Fishing line
* Self-adhesive googly eyes
* Curling ribbon
Instructions
1. Remove the tags from two Hershey’s Kisses. Cut out mouse ears from pink felt, about 3/8-inch high. Using double-sided carpet tape, affix the bottoms of the ears to the flat side of one of the Kisses.
2. Tape an 8-inch loop of fishing line behind the ears to form a hanger.
3. With more double-sided carpet tape, join together the two flat sides of the Hershey’s Kisses, with the mouse ears and fishing line loop pointing up. Add a pair of self-adhesive googly eyes.
4. Slip a tail — a 4-inch piece of curling ribbon — under the foil. Now, see how they run (or disappear) from your tree!
Proof of elegance in simplicity, these graceful paper shapes come together with two snaps of a stapler.
Materials
* Colored paper
* Stapler
* Ribbon or gold cord
Instructions
1. ORNAMENT: Cut two 12-inch strips, two 10-inch strips, and one 8 3/4-inch strip. Line them up in this order: 12, 10, 8 3/4, 10, 12, with one set of ends even. Staple this end. Line up the other ends evenly (bending the outer strips as needed) and staple.
2. HEART: Cut two 12-inch strips and two 9 1/2-inch strips. Line them up in this order: 9 1/2, 12, 12, 9 1/2, with one set of ends even. Staple this end. Now bend the unstapled ends into a heart shape, so a small heart lies inside a larger heart. Align the ends and staple together.
3. TEARDROP: Cut two 12-inch strips, two 10 1/2-inch strips, and one 9-inch strip. Line them up in this order: 12, 10 1/2, 9, 10 1/2, 12, with one set of ends even. Staple this end. Next, make a crease 1 inch from the unstapled ends of the 12- and 10 1/2-inch strips. Finally, align the ends of all the strips and staple them together.
4. Use the completed shapes to dress up a window or spin in midair from a light fixture or a ribbon. To hang each, knot the end of the gold cord and place it between the loose strips of paper at the top. Staple it all together.
Forget about postage to the North Pole. When kids roll their wish lists onto these cute-as-a-button spools, Santa will snap to attention.
Materials
* Acrylic paint and brush
* Wooden thread spool
* Marker
* Paper strip, cut to fit the width of the spool
* Double-sided tape
* Ribbon
* Self-sticking label
Instructions
1. Paint the spool and let it dry.
2. Have your child write her Christmas list on the strip of paper.
3. Roll the paper around the empty spool, using double-sided tape to fasten it, and leave some of the list hanging down (so Santa notices).
4.Thread the ribbon through the spool’s center and tie a knot at the top for hanging. Write your child’s name on the self-sticking label. Affix it to the ribbon.
You can find many more fun and unique ornaments here.
More from Write From Karen


Love ALL of these! Awesome ideas.